Most US residents depend on the local water supply, which has pipes running all throughout town. This works fine for most people, especially the more urbanized the area you live in is. However, there are some who get their water from wells installed on and around their properties. Instead of relying on public water, they have their own water supply to take advantage of. This is something one sees farther out in more rural areas, especially farms or with homes that have large amounts of land on the property. However, anyone can have a well installed so long as it doesn’t interfere with the plumbing installed and there’s enough water on your property to make it worth it.
Having your own well has numerous benefits, even though the installation process may be somewhat overwhelming and complex, especially when you first start out. You may want to have your own well, but you may not yet know everything that goes into the installation process. Here is a step-by-step guide that will help you install your well.
Pick a Spot
You need to pick a good spot to install your water well. This step will also include the help of a contractor, who’s trained in what to do to make sure the entire process goes smoothly. When deciding where to begin the installation, you and the contractor should gather the following pieces of information:
The depth of the ground in feet. Your well should be at the very least a hundred feet deep in order for you to have quality water. That being said, it would also allow for ground filtration that can remove the impurities that would be found in the well water. The deeper you dig, the more likely it is that there will be minerals present in the ground itself, which will naturally seep into the water. This may in fact require you to use water softeners as well.
The elevation at which you want your well to be located. The higher the elevation, the thinner the oxygen and the lighter the air. You mostly see this when dealing with the atmosphere or air travel, but this also very much affects your water pump and getting water from the well.
The type of soil that you have in the area. Going back to the minerals and what you could find present in the water, you need to know if what could be in the water could harm you. That, and the looser the soil the better and more water you’re able to get from your well.
Get Permits
You need to get the proper permits from your local government and the state department of environmental protection if you want to install a well. You will also need a USGS map showing the site where you want to dig your well. You will also need utility companies’ approval before starting on-site work. This is part of why a contractor will be the one to help you find the best location for installing the well, and why they and their company will likely remain throughout the process.
Drill the Well
After you’ve done the necessary research, testing, planning, and gained the permits you need, the next step is the well drilling. Which will be the actual first step towards breaking ground and getting the installation process itself started. As you are drilling, you will have to make sure that the water flows freely and does not clog the hole that you make. Drilling contractors recommend that you drill a hole of at least eight inches down. The drilling process will also take some time, so be patient and follow the instructions given by the contractor.
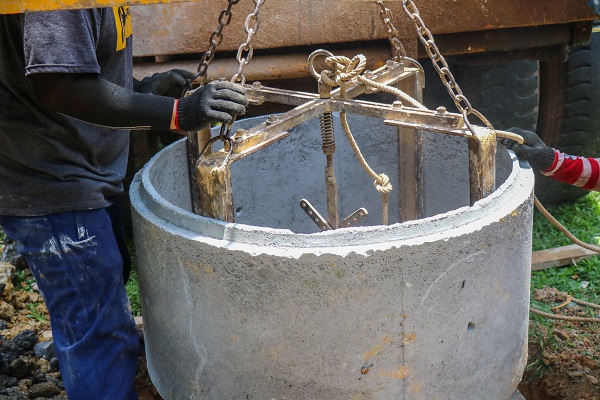
Build the Well
You will need to construct a well casing around the hole that’s been dug. This is done so that no contaminants may easily enter your well. Today, most wells are constructed with concrete tiles, although steel or PVC pipe are also viable options to consider. You may also want to build a pump if you have a shallow well. The pump will help move the water up towards the house through your pipes and other conduits.
Connect the Well
Once you have finished drilling and building, it is time to connect your well to your home and anywhere else you’d like to receive an easy access to water. This would include devices such as the faucets, pipes, or spigots you have installed. While you’re connecting your plumbing to the well, you might also consider installing a filter to remove any dirt particles or unwanted minerals from your new water supply.
Test Your Well
The last step is to test your well. You can check how much water your well has by using a hydrometer. This will help you figure out how much water you have and if it’s enough for the house. You’ll also want to test the contents of the well just to make sure everything was installed properly and there are no contaminants that are able to leak into the water.
Enjoy Your Well
You are now ready to enjoy the benefits of your well. It is time to take a deep breath and enjoy the pure water you have in your house.
Wells are a great way to provide clean water to your family. They are very simple to install and can be built with minimum tools and materials. Well drilling is also one of the safest ways to install a well. If you follow the steps mentioned above, you will be able to enjoy clean water from your well.